Quick start for a domain you already own.
Type your domain. We look up where it is registered, where its DNS lives and what it already does, and show you the same eight steps as they apply to it.
- Registered at , which also answers its DNS; its DNS is answered by .
- The registry did not say who registered it, but its DNS is answered by .
- Its DNS is answered by a host we do not recognise, so the records will be pasted in by hand. That path works everywhere.
- It already points at a server, so something is being served at today.
- Mail for it is already delivered to .
- Nothing is on it yet: no website, no mail. This is the simplest case.
Your quick start: the standard one. Nothing is on the domain, so its DNS moves to Linode in step 1 and every record after that is written for you.
Your quick start: the standard one minus step 1. Your DNS is already at Linode, so the installer and the wizard write every record for you.
Your quick start: the domain’s DNS stays at , and the setup wizard writes every record there for you — the one that points the name at your server and the six for mail — after you paste a API key. No nameserver change and no Linode token.
Your quick start: the domain’s DNS stays at . only opens its API to large accounts, so unless yours qualifies you add the records by hand: one now, six in the wizard, each printed for you with a copy button.
Your quick start: the domain’s DNS stays where it is. Its host is not one the wizard can write to, so you add the records by hand: one now, six in the wizard, each printed for you with a copy button.
Nothing is stored. We read what your domain publishes to the world, the same way the setup wizard does later. Rather not? The standard quick start is written for a brand new domain.
Eight steps for
Every screenshot opens full size if you click it.
Point your domain at Linode
Your DNS is already at Linode
Leave your domain’s DNS where it is
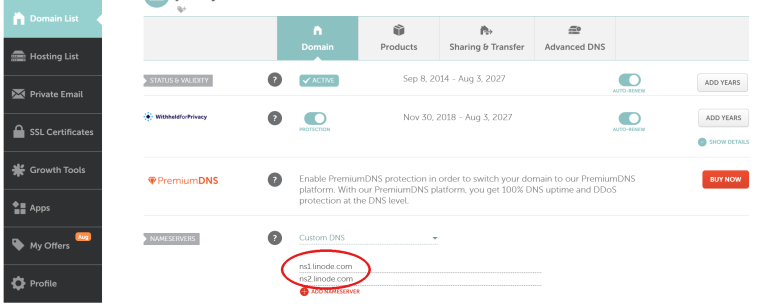
Nothing is on yet, and is not a host the wizard can write toits DNS host is not one the wizard can write to. So let Linode answer its DNS from now on: then the installer and the wizard add every record themselves, and you never type one.
- Log in at your registrar and open .
- Find the section marked Nameservers, choose Custom, and set the two entries to
ns1.linode.comandns2.linode.com. - Save.
’s DNS is answered by Linode already, so there is nothing to move. The installer adds the record that points the name at your server, and the wizard adds the mail records, both with the token you create in step 3. Nothing the domain does today is touched: records are added, never replaced.
already serves something and receives mailpublishes records for another service, and itsNothing is on yet, and its DNS is answered by , a host the setup wizard writes to directly. So the DNS stays exactly where it is (Cloudflare allows only its own nameservers on the domains it registers, so it could not move anyway), and the wizard adds every record there itself. Nothing the domain does today is replaced.
The only thing to check now is that you can log in at (the domain was bought at , but its records live at , and that is the login the wizard needs a key from).
already serves something and receives mailpublishes records for another service, so its DNS stays exactly where it is, at . Nothing you do on this page replaces what the domain does today.
The only thing to check now is that you can log in at wherever its DNS records are edited (it was bought at , but the records are edited at the DNS host, not the registrar). You will add records there in steps 6 and 8.
Set up mail sending
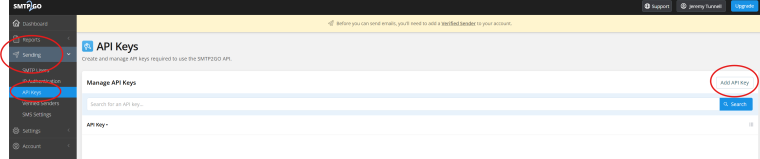
Open a free account at SMTP2GO. The free plan sends 1,000 messages a month, and your mail still lives on your own server — only the last hop out to the world is borrowed.
- In the left menu, open Sending and then API Keys.
- Click Add API Key and name it anything —
Joineryis fine. - Check its Permissions before saving. Turn on two groups: Emails and Sender Domains.
- Copy the key somewhere safe. You paste it into the setup wizard later.
Open a Linode account and create a token
Open a Linode account
Sign up through our referral link and you get $100 of credit to spend over your first 60 days — more than enough to run your site free for two months. You will verify your email address and add a card. Once the Linode dashboard loads, you are ready.
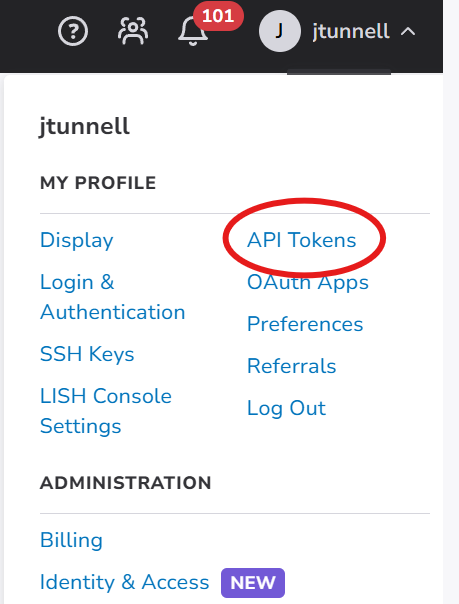
- Open the profile menu at the top right and choose API Tokens.
- Click Create a Personal Access Token and label it
Joinery Token. - Set the expiry to In one month.
- Set Domains and Linodes to Read/Write, and everything else to No Access.
- Click Create Token and save what it shows you. You paste it in step 4.
Create your server
This is the step that builds everything. Open the Joinery installer, click Deploy New Linode, and a form appears. Here is every field on it.
The Joinery fields, at the top
- Admin email address — the address you will log in with. Use the real one you read today, not the new one you are about to create: it is also how you recover the account if you forget your password.
- Admin password — your login password. Choose a strong one and save it.
- Site domain —
, exactly that. Nowww, nohttps://. - Site domain — already serves something, and pointing it at this server would replace that. So give Joinery a name of its own under the domain:
home., and type that. Your email addresses will still beyou@; the wizard sets that up. - Linode API token — paste the token from step 3.
- Linode API token — leave it blank.
The server fields, below
- Image — the operating system. Only the version Joinery supports is offered, so leave it alone.
- Region — where in the world the machine physically sits. Pick a city near you; any choice works.
- Linode Plan — the size. Click the Shared CPU tab and choose Nanode 1 GB at $5 a month. It is plenty to start with, and you can grow later without reinstalling.
- Linode Label — a nickname in your Linode dashboard.
joineryis fine. - Root Password — not your website login. This is the master password for the rented machine, which Linode requires you to set. Make it at least 12 characters, save it, and you will probably never need it again.
Click Create Linode. The machine boots and installs Joinery entirely on its own — web server, database, application, all of it. Give it 5 to 10 minutes, and use the wait to do step 5.
One thing to copy while it builds: the Linode dashboard shows your new server’s IP address, four numbers separated by dots, on the server’s own page. You need it to log in, and for the record in the next step.
Make a backup bucket
Open Backblaze B2 and sign in to the dashboard. The first 10 GB is free and anything beyond it is cheap.
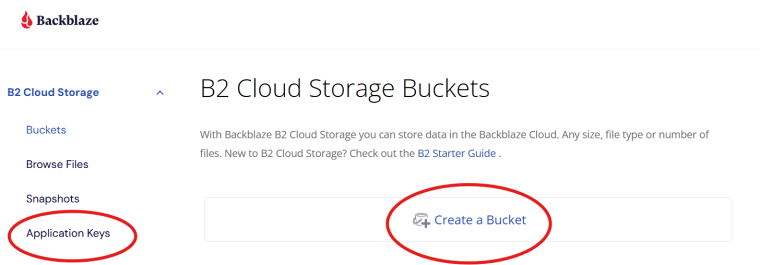
- Click Create a Bucket, name it
joinerybackups, and leave every other option at its default. - Back on the dashboard, click Application Keys in the left menu.
- Click Add a New Application Key and name it
backupkey. - Choose the bucket you just made from the dropdown, and set access to Read and Write.
- Click Create New Key and save what it shows you, along with the bucket name.
Point at the server
Log in at wherever ’s DNS records are edited and add one record. The screen is called DNS records, Advanced DNS or Zone editor depending on the host; the record is the same everywhere.
| Field | What to enter | |
|---|---|---|
| Type | A | |
| Name or Host | @ (some hosts want it blank, or ) | home |
| Value, Points to, or Address | the server’s IP address from step 4 | |
| TTL | leave the default |
Save it. The change takes anywhere from a few minutes to a few hours to spread across the internet, and the server watches for it: the moment your name reaches it, it fetches its own certificate and switches the padlock on. Nothing to press.
If your account does qualify for its API, you can skip this step: the wizard’s Secure connection screen offers to add the record for you.
Log in
Ten minutes after you clicked Create, open a browser and go to your own site:
https:///admin
Log in with the admin email and password you typed on the form in step 4 — not the root password.
http:///admin works in the meantime. Domain names take a little while to spread across the internet, and the secure version switches itself on shortly after yours arrives.http:// followed by the address from step 4, then /admin. Everything works from there, and the padlock catches up on its own once the record lands.http:// followed by the address from step 4, then /admin. Everything works from there, and the padlock catches up on its own.Walk through the setup wizard
Your site opens its setup wizard the first time you log in. Each screen explains itself, so go through them in order. Do not skip the email screen: a password reset email is the way back into your account, and a brand new site cannot send one until mail is configured.
Have ready to paste: the SMTP2GO key from step 2, and the Backblaze bucket name and key from step 5. The Linode token is already in place — the wizard uses it once to add your mail records, then deletes it. Your mail is delivered to today; one of those records, the MX, is the one that moves delivery to Joinery, and the wizard shows it to you before writing anything, so untick it until you are ready to switch.
Have ready to paste: the SMTP2GO key from step 2, and the Backblaze bucket name and key from step 5. Two screens write to your domain, and both use a API key. The first screen’s How do I get this? link walks you through making one; keep it to paste twice. It is used for the write and never stored.
Secure connection offers to add the record that points at your server. It shows the one record it will write, you paste the key, and it writes it. A few minutes later the padlock switches on by itself.
Email needs about six records so the world accepts mail from and delivers mail to it. The wizard shows every record it is about to add at , and adds them when you confirm.
Have ready to paste: the SMTP2GO key from step 2, and the Backblaze bucket name and key from step 5. Two screens touch your domain:
Secure connection checks the record you added and shows the address it expects. If it says not connected, the record has not spread yet; keep going and press Check again later.
Email needs about six records added to so the world accepts mail from it and delivers mail to it. If your account qualifies, the wizard adds them through the API; otherwise choose manually, and it prints each record with a copy button for you to add on the same screen you used in step 6, then Refresh confirms them.
Email needs about six records added to so the world accepts mail from it and delivers mail to it. The wizard prints each record with a copy button; you add them on the same screen you used in step 6, then press Refresh and it confirms them.
Open your new mailbox
Click your avatar at the top right and choose Dashboard, or go straight to /profile. Then click Email in the submenu.
That is your mail, on your domain, on your server. You are done.
Half an hour from here.
Type your domain at the top and start at step one.